1. Find out if solar is right for you
Site factors
- Nothing shading your roof
- A southerly-facing pitch
- Space for panels
- Installation-friendly roofing materials
Logistical factors
- Higher cost of grid energy (> 10¢ per kWh)
- Solar-friendly utility
- Net metering/solar buyback
- HOA approval
Get a solar assessment
Map your roof using our awesome online savings calculator.
Call us! 832-844-5790

2. We submit an official cost proposal
Once we’ve ascertained that you would benefit from having a solar system and understand the likely costs, we’ll provide a comprehensive proposal. This document details the complete scope of work, pricing, system specs, and performance projections. Included in the proposal is the contract to begin work.
3. Design and engineering
Every roof’s structure, size, orientation, and material is unique, so your system has to be designed before it’s installed. We also take into account wind loads, proximity to your electrical panel, and aesthetics. These systems are made to last for decades, so each one is designed and stamped by a licensed engineer.
We don’t want your solar panels to look lame once they’re installed. Getting the design right from both a functional and an aesthetic perspective is crucial.
4. Get permits
Depending on where you live, there may be a municipal permit required in order to install a solar system on your roof. We ascertain permitting requirements way back at the Assessment stage, so there are no surprises, but this is often the biggest bottleneck in the process. Our experience has taught us how to streamline permit applications, so you’re in good hands.
This isn’t actually the line at the permitting office, but it definitely feels like this sometimes. In many municipalities, waiting for the permit is the longest part of the solar process.
5. Install the system
This is where we finally make it happen! Residential installs generally take only a couple of days, while commercial projects can go on for months.
Starting off, we’ll establish a safe route from the ground onto your roof. This is generally a ladder or two, but we’ve used bucket trucks, boom lifts, and even cranes in the past. We’ll begin mounting the hardware, then setting rails, followed by securing the panels themselves. Once everything is installed according to our engineering, we’ll wire the panels together. This actually takes a little bit of math to coordinate circuits to maximize your system’s output.
Concurrently with mounting the panels, a licensed electrician will run conduit and electrical wires from the rooftop to your power panel. We’ll plug in an inverter and some other hardware that makes the system work, and test it all to make sure it works peachy, prior to calling for an inspection.
In this video, Jimmy yacks for a while about how great our solar systems are, and how happy you’ll be once you get one. Fun fact: this video was shot on a 4 kW project we did with Habitat for Humanity in Houston’s Fifth Ward. Really fun project!
6. Pass inspection
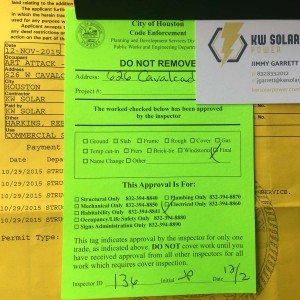
If your system required a permit, it will also require an inspection. A skilled inspector from your city or municipality will come to verify that we put the system in properly. They’re looking to see that all the fasteners are in place, that the panels are connected and working properly, and that we didn’t put any problematic holes in your roof. Once the inspector gives us a green tag of approval, we flip on the system and let it start generating for you.
Yep, this is a bona fide green tag, awarded on our first attempt in honor of a successful commercial installation. You could get one, too!
7. Free electricity!
Granted, you just dropped tens of thousands on your new system, but your very next power bill will be significantly smaller than the one before, and this savings will continue for decades. Not only are you doing a solid for the planet and not funding certain oppressive dictators by buying their only export, but the system will probably pay for itself several times over.
What about maintenance?
Solar panels have no moving parts, and require very little maintenance. They should be cleaned and tested every so often, maybe one or two times a year, depending on your weather. You can do this yourself, or holler at us about our solar maintenance services.

